The product import is found under “Tools” > “Product Import”. It’s a simple 4 step process where you can upload a CSV file of products to add or edit in your.
See an example CSV file by exporting your existing products to CSV.
When importing you can ADD products to your store and/or EDIT products in your store in the one file. To do this:
- Include a column dedicated to the Product ID
- When editing a product, include the Product ID of the product in this field
- When adding a product, leave the Product ID field BLANK.
Note, Product IDs of existing products can be obtained via an export, or found when viewing products in your shop.
Other important things to note about importing:
- a Product Name must always be included in every import
- No more than 1000 products may be processed at once. If you have more than 1000 products to process split these into separate import files
- The CSV file can not be bigger than 4MB.
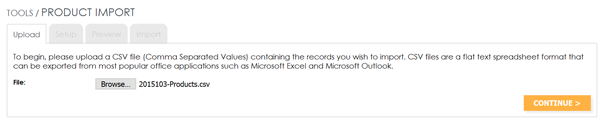
Step 1 – Upload your CSV file
Click the “Browse” button and locate your CSV file on your computer. Once selected press CONTINUE.
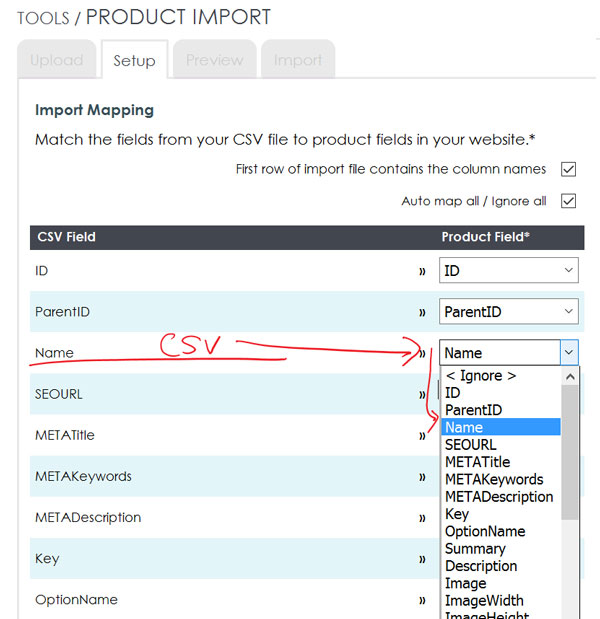
Step 2 – Map your CSV columns to fields in your site
This step is where we tell the import to save the data from your csv file in your site. If you are working with a CSV file that you have exported from the website, the “Auto map all” toggle at the top of the list will quickly map all your fields. Alternatively you can map them one by one.
If the row at the top of your CSV file has the names of the columns, ensure that “First row of import file contains the column names” is checked.

The left column entitled “CSV Field” contains all the CSV columns from your file. Map each of these columns to a product field in your website by choosing the website field from the corresponding drop down in the “Product Field” column.
Category Options
When importing products, you have the option to import these products into categories within your website. If you want to ignore the categories, leave “Ignore categories” checked. Alternatively you can select “Add products to categories” or “move products to new categories”. Simply check either of these options and select the categories by pressing “+Add” under the “Select Categories” box.
“Add products to categories” will keep any existing category assignments in tact.
“Move products to new categories” will remove any existing category assignments and move the products to the selected category.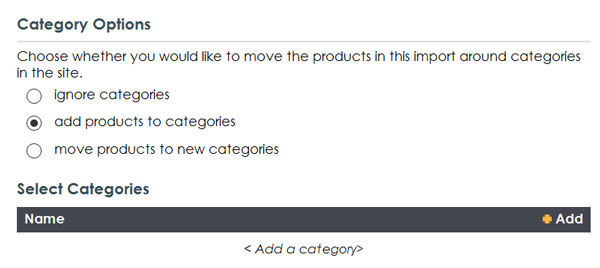
Once you have mapped your fields and chosen what you want to do with categories. Click CONTINUE in the bottom right to preview the data.
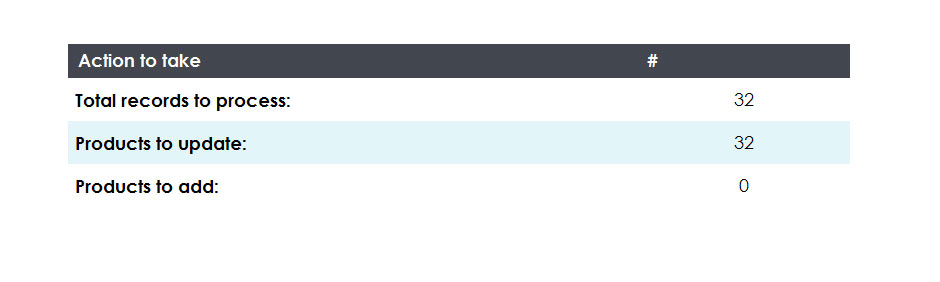
Step 3 – Check your import data
Before processing the import please check the data on the Preview screen. This screen outlines the mapping that you have chosen. And it gives you a run down of how many products will be Updated and how many Added. Please check this against your expectations for the import. If you are happy with the Preview. Press IMPORT to begin the process.
Step 4 – DONE
The import will report on the records that were Added, Updated and Skipped. Download the report for details on what happened. Product IDs will be outlined in the report so that you can check your data in the website.
