Have you uploaded a picture to your website straight from your camera or computer? Do your images load really slowly or look distorted and not as clear as you would like?
This might be because of the file size and dimensions of the image you originally uploaded to your product, category or webpage. If you upload a large 2000 pixels wide x 3000 pixels high image straight from your camera to your website, the picture will be much bigger than is necessary for your website. The results will be that your web page slows down, the display of your image slows down and the image may not be as crisp and clear as you would like.
On the category pages, a product thumbnail is loaded for each of your products, if the original size of the picture you uploaded for your thumbnail is 1mb (2000 x 3000 pixels in dimension) and you have 5 products in that category, the webpage is going to be loading more than 5mb which is a lot of content for your visitor to download. If they’re viewing your site on their phone, you’ll be eating into their data plan very quickly and your site won’t be displaying as quickly as you would like!
So what’s the solution?
It’s a good idea to resize your pictures on your computer, before you upload them to the website.
How to resize your pictures on your computer…
If you’re using a PC, there’s 2 programs that come with your Windows installment you can use. We’ll give you instructions on how to resize and crop your images for each of these programs here. The programs are:
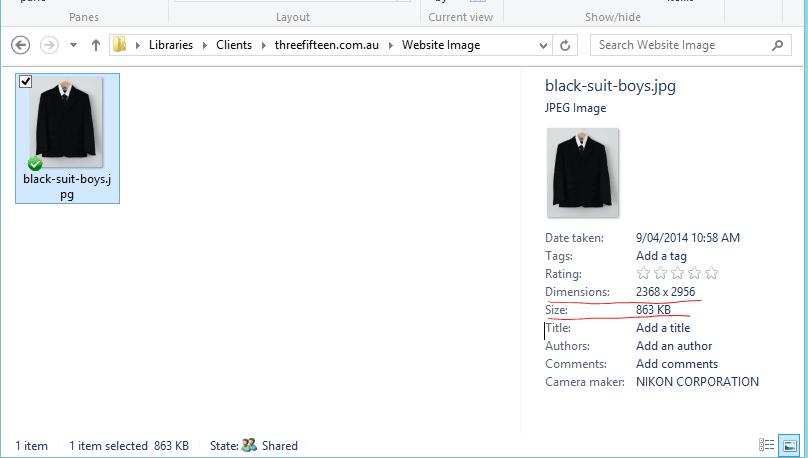
To get an idea of what file size and dimensions your picture is, view your image in Windows Explorer. If you have your Details Pane switched on you’ll see the dimensions and size of the image you’re starting with here. An example is here:
Editing with Office Picture Manager
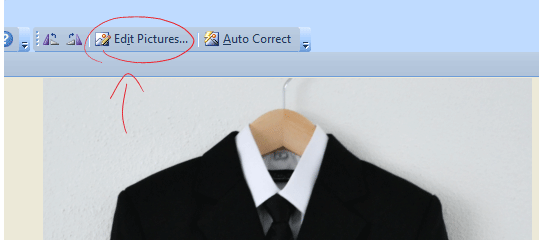
Open the image in Office Picture Manager: Right click on your image and go to “Open With” > “Microsoft Office 2010”.
Click on the link in the toolbar called “Edit Pictures”.
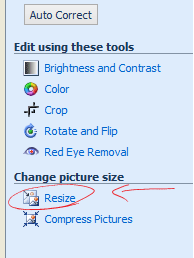
In the panel that opens on the right hand side of the program click “Resize”.
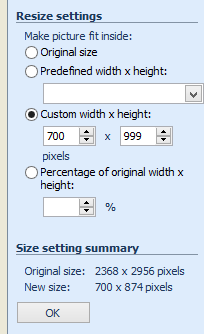
Here you have a number of options to resize the image. For this tutorial we’ll use the Custom width and height option. So tick the button for Custom width and height.
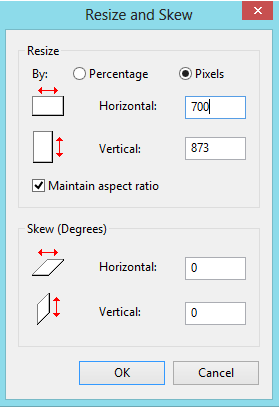
To resize based on a width, enter your width into the first box, and 999 into the height box. Putting 999 into the height box will allow the image to resize to that width and adjust the height accordingly. In this example we’re resizing to a width of 700.
To resize based on a height, enter your height into the second box, and 999 into the first width box. Putting 999 into the width box will allow the image to resize to that height and adjust the width accordingly. In this example we’re resizing to a height of 700.
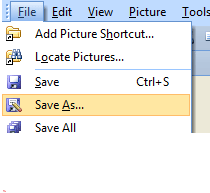
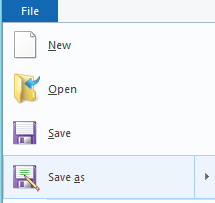
Click OK to commit the change. Then go to “File” > “Save As…” to save the image on your computer at the new size.
Crop your image
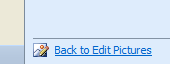
For extra image editing you can crop your image to a specific size. To do this click “Back to edit pictures” in the bottom of the right hand panel. Or click “Edit Pictures” if you’re starting from scratch.
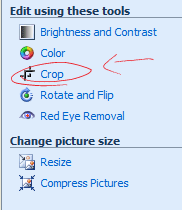
Click on “Crop” under “Edit using these tools”.
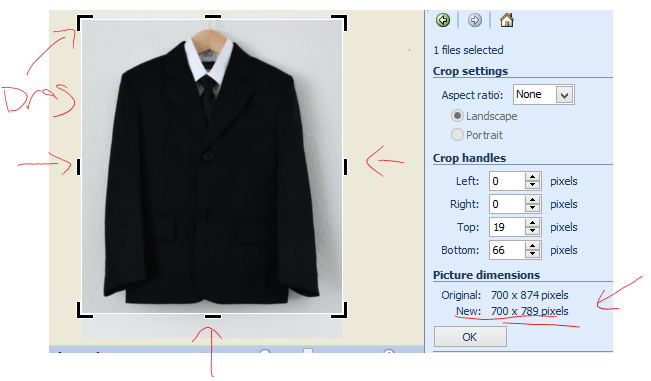
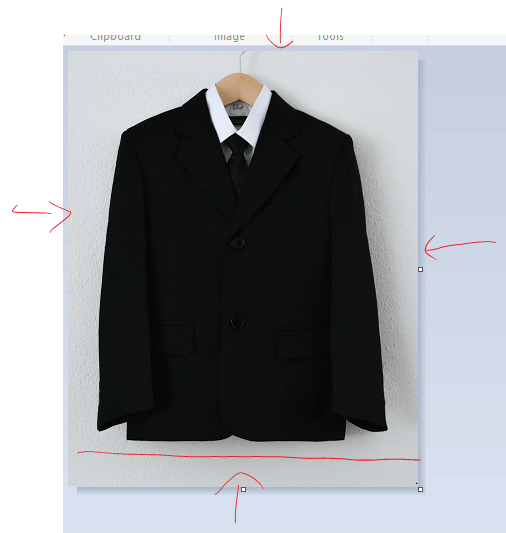
Use your mouse to drag the edge of the image from any of the sides. Keep your eye on the Right Hand panel if you’re concerned about dimensions. But if you simply want to remove parts of the image to zoom in closer, just drag the edges where you want them.
Click “OK” to commit the changes. Then choose “File” > “Save As…” to save the new image.
NOTE: If you just click “File” > “Save” you will save over the top of your original image and won’t have the larger image to work from in future.
Editing with Microsoft “Paint”
Open your image in Paint: Right click on the image you are viewing and choose “Paint” from the programs.
Under the home menu click “Resize”.
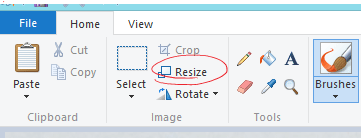
You can resize the image by a percentage, or by entering a custom height or width in pixels. For this example we’re resizing the image to 700 pixels wide.
Crop your image
To crop your image simply drag the edges in from the side you want to crop.
When you have the image just right you can simply save the image by going to “File” > “Save As…”.
NOTE: Using Save As will enable you to save the image with a new file name so that you don’t save over the top of your original copy of the image.
Editing your image to a specific size
When creating a thumbnail of your image, you might want to set the image to a specific size. For this example we’ll set this original image to 130 pixels wide x 170 pixels high.
The first thing to do is resize the image, resize the image to the desired height or width, whichever leaves with left over to crop. For example, with this image:
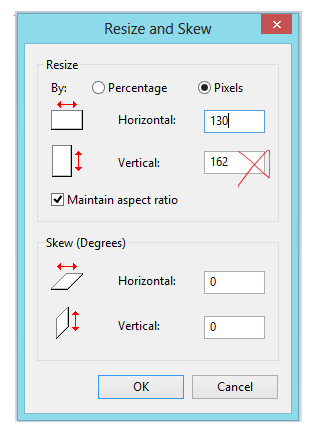
If we set the desired width to 130, the height becomes 162 which is less than our desired dimensions.
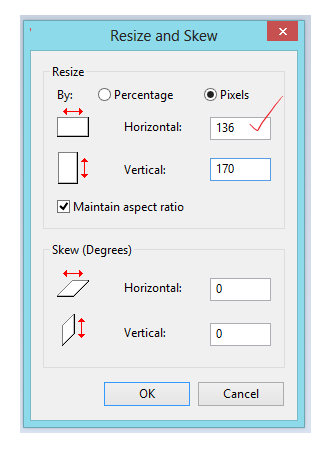
If we set the height to our desired height of 170, the width will become 136 which we can crop down to 130. Our image will then be just right at 130 by 170.
So resize to height 170, then use the cropping tool to crop the edges so that the width is 130 exactly.
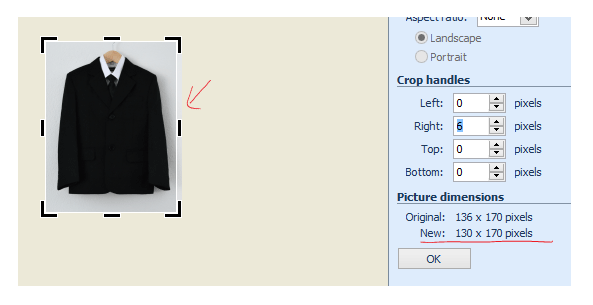
In Picture Manager, the new dimensions can be seen in the right hand panel when you’re cropping.
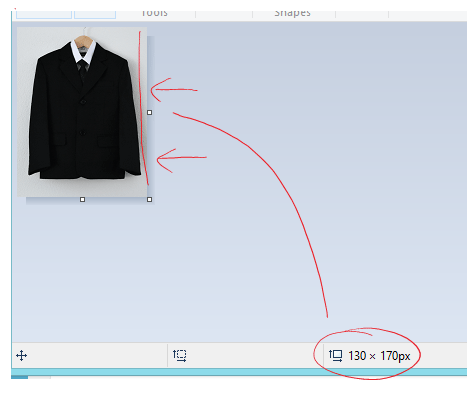
In Paint, the dimensions are located in the bottom toolbar when you’re cropping the image.
Creating filenames for your images
Did you know that images can be indexed and help with Search Engine Optimisation? When saving your images:
- use the name of your product or something descriptive of the image itself
- remove any spaces or weird characters in the file name, replace spaces with a dash (-)
- keep your thumbnails the same filename as your larger image but put “thm” at the end of the filename before the file extension. For example: “boys-black-suit.jpg” and “boys-black-suit-thm.jpg”
- save pictures and colourful images as .jpg and images with not many colours as .gif